SANGOにはデフォルトでTwitter、Facebook、Instagram、Feedlyなどのシェアボタンを表示可能ですがこれ以外のSNSのボタンを追加したい時があると思います。
この記事ではこの記事を書いた人にオリジナルのボタンを追加する方法を紹介します。
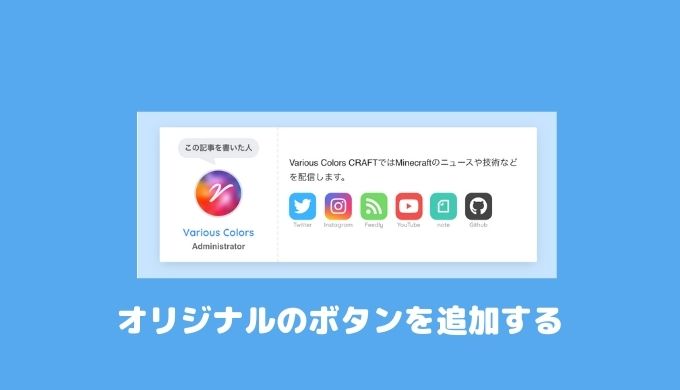
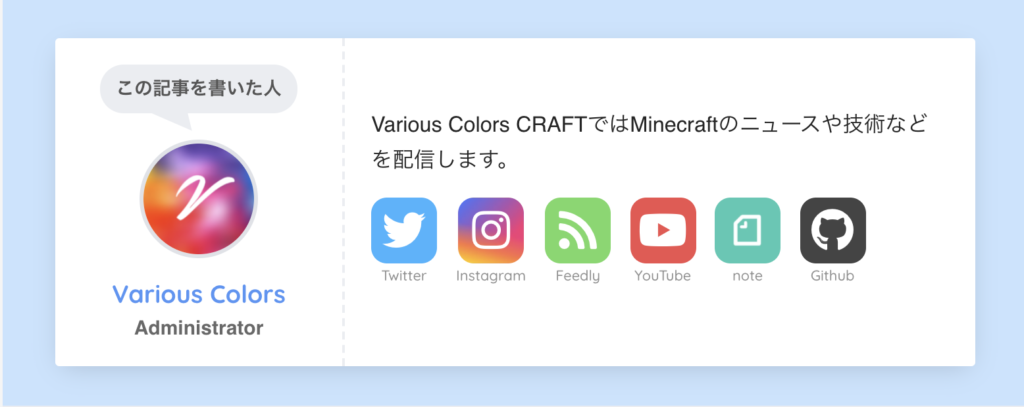
イメージ
イメージは以下のような感じです。
noteとGithubを追加しています。管理画面から設定できます。
WordPressを一人で利用している場合はSANGOカスタマイズガイドで紹介されている方法を使用すると簡単なのですが複数人でWordPressを利用していると全てのユーザーのSNSのリンクが同じになってしまいます。
そのためユーザーがそれぞれ別のリンクを設定できるよう管理画面からリンクを設定できるようにカスタマイズしていきます。この方がWordPressに慣れていない方でも安心して設定できるようになると思います。
実装
今回の場合functions.phpに記述しても親テーマが読み込まれてしまうため上書きできません。そのため親テーマのSANGOの連絡先情報を無効化します。
子テーマのfunctions.phpに以下のコードを記載してください。
function remove_sango_add_user_contactmethods()
{
 remove_filter('user_contactmethods', 'add_user_contactmethods');
}
add_action( 'after_setup_theme', 'remove_sango_add_user_contactmethods' );参考拡張プロフィール
管理画面のプロフィールの連絡先情報にTwitterなどの表示が無ければ成功です。

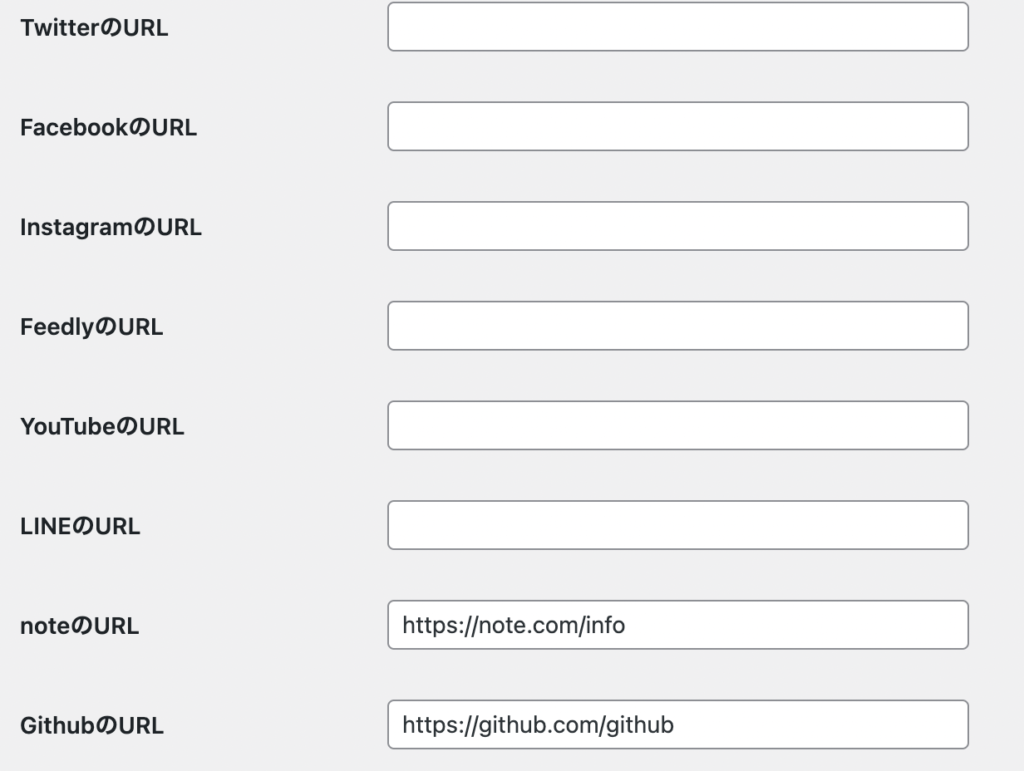
次にSNSを追加していきます。今回はnoteとGithubを追加しました。
こちらも子テーマのfunctions.phpに以下のコードを記載してください。
function add_user_contactmethods2($user_contactmethods)
{
 return array(
 'yourtitle' => '肩書き(入力するとプロフィールに表示)',
 'twitter' => 'TwitterのURL',
 'facebook' => 'FacebookのURL',
 'instagram' => 'InstagramのURL',
 'feedly' => 'FeedlyのURL',
 'youtube' => 'YouTubeのURL',
 'line' => 'LINEのURL',
 'note' => 'noteのURL', // noteを管理画面に追加
 'github' => 'GithubのURL', // Githubを管理画面に追加
 );
}
add_filter('user_contactmethods', 'add_user_contactmethods2');
すると管理画面にnoteとGithubが追加されていると思います。
追加された所にリンクを記入しましょう。
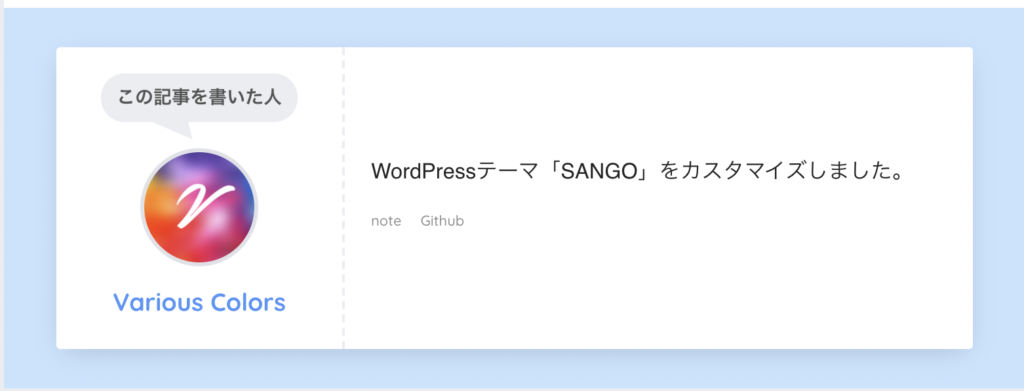
これだけではまだ表示はされません。
「この記事を書いた人」を表示させるコードにnoteやgithubのリンクを出力するコードが記載されていないためです。
以下のコードを子テーマのfunctions.phpに記載することで表示させることができます。
function insert_author_info()
{
  $author_descr = get_the_author_meta('description');
  // プロフィール情報が空欄のときは表示しない
  if (empty($author_descr)) return;
?>
	  <div class="author-info pastel-bc">
	    <div class="author-info__inner">
	      <div class="tb">
	        <div class="tb-left">
	        <div class="author_label">
	          <span>この記事を書いた人</span>
	        </div>
          <div class="author_img"><?php
            $iconimg = get_avatar(get_the_author_meta('ID'), 100);
            if($iconimg) echo $iconimg; ?></div>
	          <dl class="aut">
              <dt>
                <a class="dfont" href="<?php echo esc_url(get_author_posts_url(get_the_author_meta('ID'))); ?>">
                  <span><?php esc_attr(the_author_meta('display_name')); //名前 ?></span>
                </a>
              </dt>
              <dd><?php esc_attr(the_author_meta('yourtitle'));?></dd>
	          </dl>
	        </div>
          <div class="tb-right">
            <p><?php the_author_meta('user_description'); //プロフィール文 ?></p>
            <div class="follow_btn dfont">
            <?php
              $socials = array(
                'Twitter' => esc_attr(get_the_author_meta('twitter')),
                'Facebook' => esc_url(get_the_author_meta('facebook')),
                'Instagram' => esc_url(get_the_author_meta('instagram')),
                'Feedly' => esc_url(get_the_author_meta('feedly')),
                'LINE' => esc_url(get_the_author_meta('line')),
                'YouTube' => esc_url(get_the_author_meta('youtube')),
                'note' => esc_url(get_the_author_meta('note')),  // noteをこの記事を書いた人に表示
                'Github' => esc_url(get_the_author_meta('github')), // Githubをこの記事を書いた人に表示
                'Website' => esc_url(get_the_author_meta('url')),
              );
              foreach ($socials as $name => $url) {
                if ($url) { ?>
                  <a class="<?php echo $name; ?>" href="<?php echo esc_url($url); ?>" target="_blank" rel="nofollow noopener noreferrer"><?php echo esc_attr($name); ?></a>
          <?php }
              }?>
            </div>
          </div>
	      </div>
	    </div>
	  </div>
	<?php }
CSSを追加
CSSが当たっていないため表示が変なので色やアイコンを付けましょう。
アイコンはFont Awesome 5を使用しています。子テーマのstyle.cssにコピペしてください。

.follow_btn .Github:before {
  background: #444444;
  content: "\f09b";
}
ブランドロゴ以外のアイコンを使いたい場合は以下のように追記する必要があります。
.fa5 .follow_btn .Github:before {
  font-family: "Font Awesome 5 Free";
  font-weight: 900;
}
noteのアイコンはfontawesomeで公開されていないため画像を使います。
314×314のサイズがおすすめです。
.follow_btn .note:before {
  background: url("http://example.com/wp-content/uploads/2021/05/note.jpg");
  background-repeat: no-repeat;
  background-size: cover;
  content: "";
}